« Configuring the Marketing Tab
This add-on is included with your purchase of the Basic, Plus, or Pro edition of MemberPress.
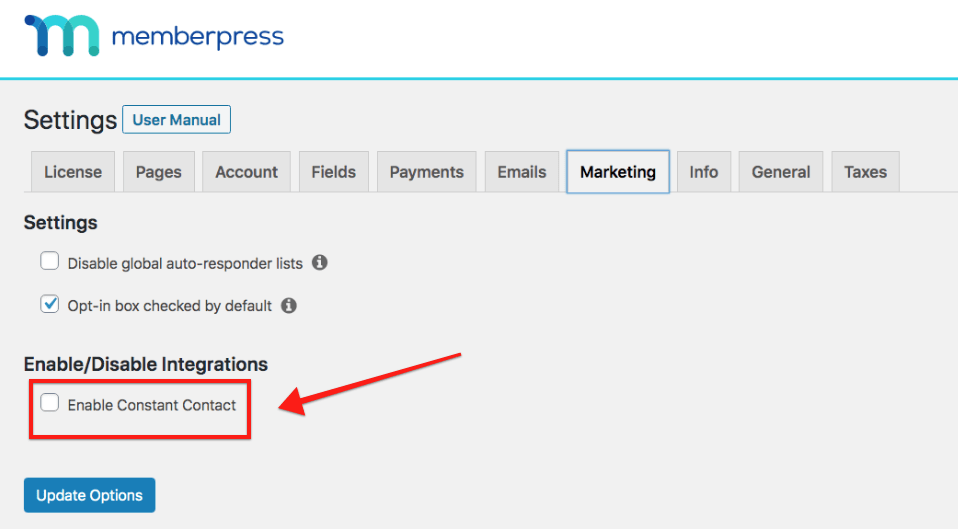
Step 1 – Install the Constant Contact Add-on
In your dashboard, head to MemberPress > Add-ons, and click to install the Constant Contact add-on. Once installed, it will be automatically activated, and you'll see the Constant Contact integration available in the “Marketing” tab of the MemberPress Settings page.
Step 2 – Get Your Constant Contact API Key and Access Token
If you don't already have a Constant Contact Mashery account, you'll need to create one here: https://constantcontact.mashery.com/member/register
Once you've created your Mashery account and logged in, you'll need to create a new App.
Your new app should provide you with the API Key. But you'll also need to generate an Access Token for your new app here: https://constantcontact.mashery.com/io-docs (It's a giant pain, we know).
Step 3 – Paste Your Key and Access Token Into MemberPress
Copy the Key and Access Token generated in Step 2, and paste it into the Constant Contact API Key and the Constant Contact Access Token fields as shown below. NOTE: You do not need to use the Secret key.
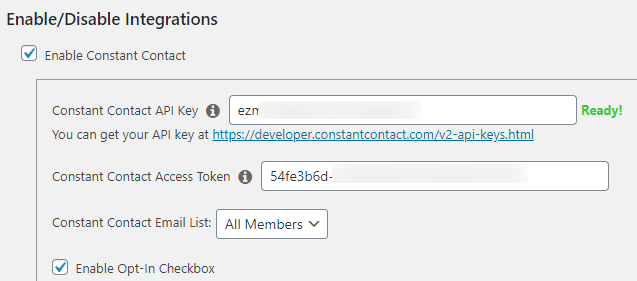
Step 4 – Select Email List
Once your API Key and Access Token are in place, MemberPress will connect with Constant Contact to populate your email list. When it appears, select the email list you would like to use from the Constant Contact Email List drop-down.
Global Lists
Once you've completed the steps above, MemberPress will automatically add the email address for everyone who signs up through your membership registration form to your Global email list in Constant Contact. MemberPress never removes a user from the Global list.
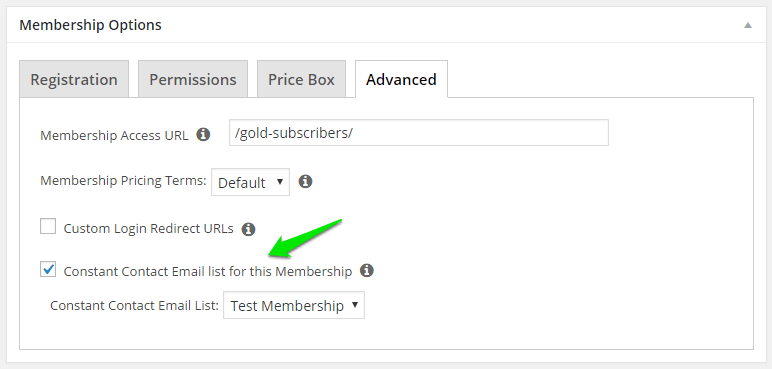
Step 5 – Setup Per-Membership Lists (Optional, but STRONGLY recommended)
Per-membership lists are a great way to automatically segment your members into different lists for marketing purposes.
Once Constant Contact is enabled, a new option will appear under the “Advanced” tab of the Membership Options on the membership edit pages. This option allows you to specify a list to which only members who purchase that specific membership will be added. Members will be automatically added to or removed from this list depending on their current subscription status for that membership. This list must be different from the Global list you have specified in the Options AND should be different from other Per-Membership lists.
Here's how to enable and select your Per-Membership lists:
This concludes all the necessary steps needed for this integration.
I'm confused. Help!
Shoot us an email from our support page if you need any further assistance with this integration.


